Particles and Sounds
outdated
DANGER
Some information from this page was copied here
Particles in Animation
Minecraft Particles can be used in entity animations. For example, the phantom has an animation which emits the minecraft:phantom_trail particle constantly. Let's try to add a particle to our entity's attack animation.
part of RP/entity/description/
  "particle_effects": {
    "l_explosion": "minecraft:large_explosion"
  },
2
3
This piece of code is located in our resource entity file. Here we defined the shortname ("l_explosion") for the particle we are going to use, "minecraft:large_explosion".
You can test a particle in-game with the /particle <namespace:particle_id> ~ ~2 ~ command. You can view the full list of Vanilla Particles here.
Now for the Blockbench part.
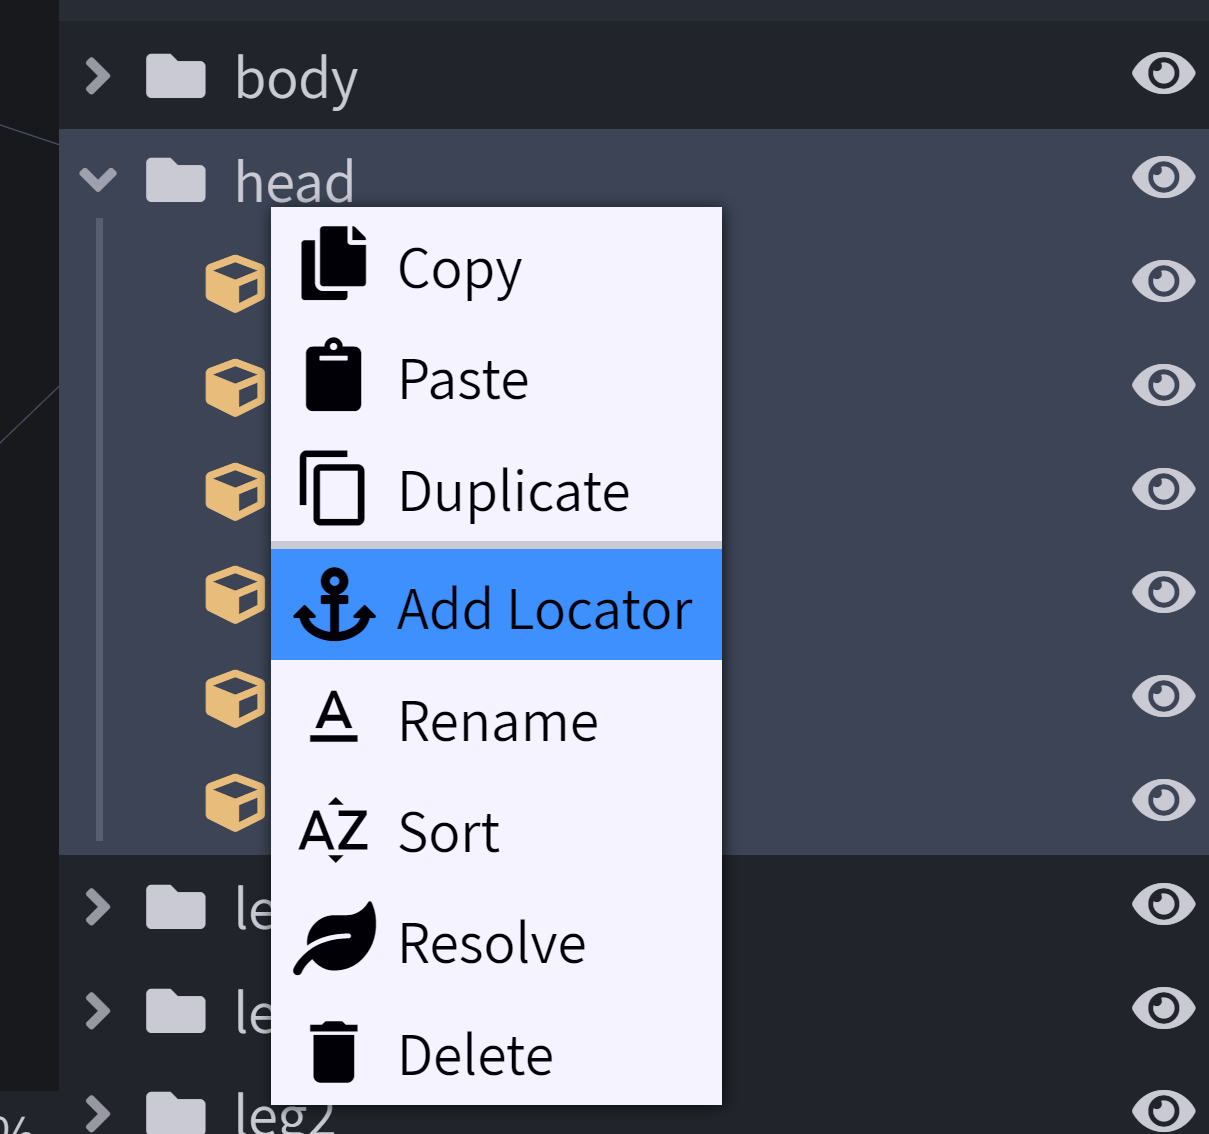
- Right click the bone were your particle will be emitted from, and choose 'Add Locator' with the anchor icon. Name it something distinct, like 'l_expl_emitter'. Now move the emitter to the desired location.
Note: you can also use locators to define where a lead will leash to, if you name your locator 'lead'.
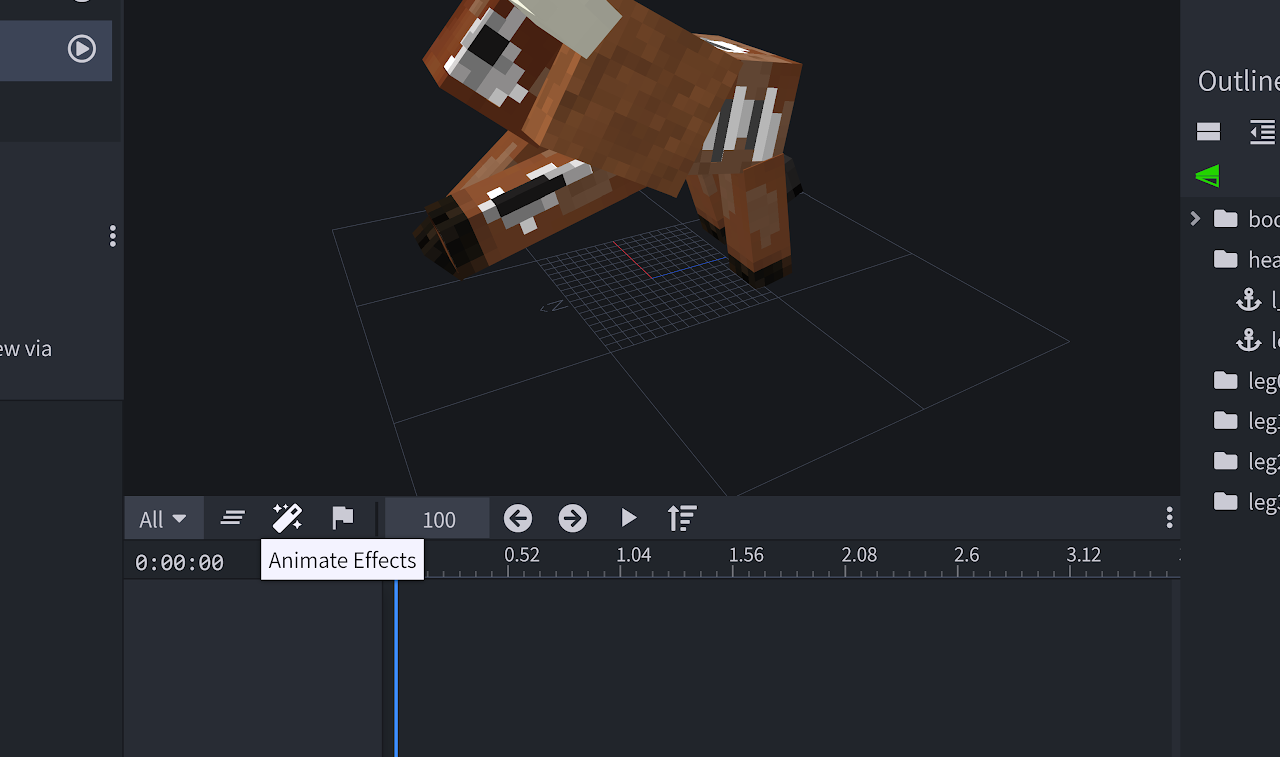
- In the 'Animate' section, choose 'Animate Effects' on your timeline, then click on the '+' icon near the 'Particle' object.
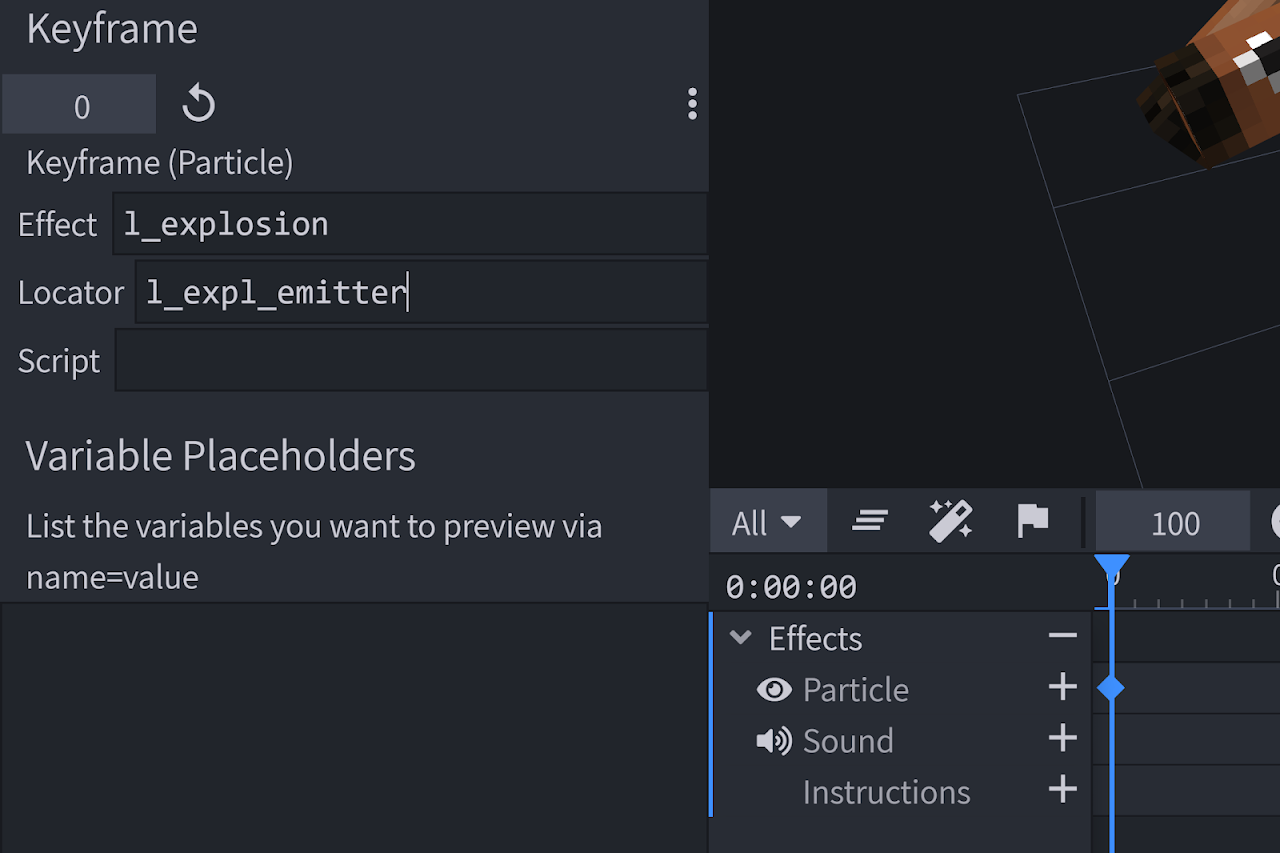
- You will see this menu on your left. 'Effect' asks for your particle's shortname, and 'Locator' asks for the name of your Locator/Emitter object.
Note: you can add sounds to animations in a similar way.
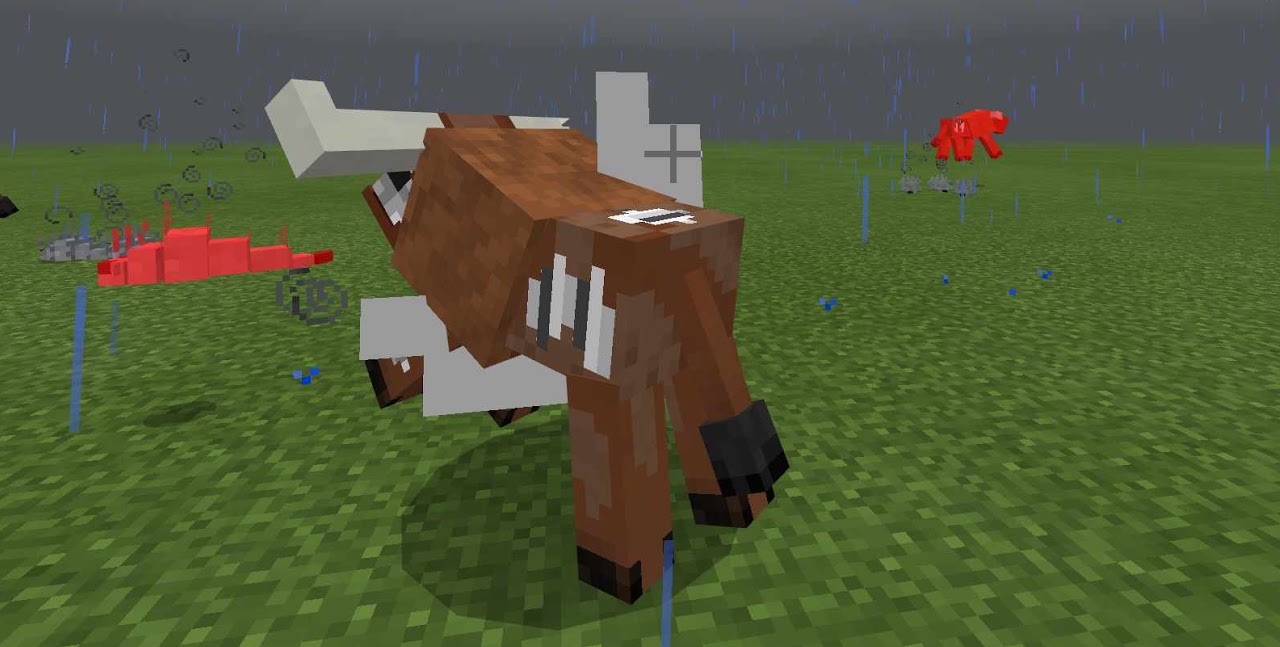
Now you're good to go! Save the model and the animations. If you did everything correctly, the defined particle will spawn whenever the entity attacks. Of course you could put another particle on the walking animation's timeline (for example, hooves making dust) in the same way.
Custom Particles
Custom particles are defined in the RP/particles folder. As mentioned earlier on this page, you can summon particles using the '/particle' command (e.g in Behavior Animations) or using Resource Animation emitters. The best way to learn custom particles is to play around with the example files from the Vanilla Example resource pack and the Particle Example Pack, and of course, from the documentation on bedrock.dev.
Note: Skip to the end of this section for a tool to generate particle files visually.
File structure:
- "identifier" is exactly what you'd expect: I'll use "wiki:curvy_particle" and "wiki_pink_hit" for the tutorial. File names do not matter.
- "texture" defines the texture file. Not that a single image file can hold textures for many particles.
- "material" is usually set to "particles_alpha" for particles.

That is the texture I'm going to use, it's size is 16x16. (RP/particles/wiki_particles.png). As you can see, it has 4 different textures in it, each of them being a 8x8. The upper row (starting/top left corner at at 0, 0) is the flipbook texture for "wiki:curvyparticle" and the bottom row (_top left corner at/starting at 0, 8). We'll define this in the "billboard_texture" component.
{
	"format_version": "1.10.0",
	"particle_effect": {
		"description": {
			"identifier": "wiki:curvy_particle",
			"basic_render_parameters": {
				"material": "particles_alpha",
				"texture": "textures/particle/wiki_particles"
			}
		},
		"components": {
			"minecraft:emitter_rate_instant": {
				"num_particles": 50
			},
			"minecraft:emitter_lifetime_once": {
				"active_time": 0
			},
			"minecraft:emitter_shape_sphere": {
				"radius": 0.3,
				"direction": "outwards"
			},
			"minecraft:particle_initial_speed": "Math.random(0.0, 15.0)",
			"minecraft:particle_initial_spin": {
				"rotation": "Math.random(0, 360)",
				"rotation_rate": "Math.random(-300, 300)"
			},
			"minecraft:particle_lifetime_expression": {
				"max_lifetime": "Math.random(1.0, 4.0)"
			},
			"minecraft:particle_motion_dynamic": {
				"linear_acceleration": [0, 2.0, 0],
				"linear_drag_coefficient": 5,
				"rotation_drag_coefficient": 0.3
			},
			"minecraft:particle_appearance_billboard": {
				"size": ["0.11", "0.11"],
				"facing_camera_mode": "lookat_xyz",
				"uv": {
					"texture_width": 16,
					"texture_height": 16,
					"flipbook": {
						"base_UV": [0, 0],
						"size_UV": [8, 8],
						"step_UV": [8, 0],
						"frames_per_second": 2,
						"max_frame": 2,
						"stretch_to_lifetime": true,
						"loop": false
					}
				}
			},
			"minecraft:particle_appearance_lighting": {}
		}
	}
}
2
3
4
5
6
7
8
9
10
11
12
13
14
15
16
17
18
19
20
21
22
23
24
25
26
27
28
29
30
31
32
33
34
35
36
37
38
39
40
41
42
43
44
45
46
47
48
49
50
51
52
53
54
55
Here's the code for our first particle, "wiki:curvy_particle". Our texture file is defined.
The components are quite complicated here, but they're explained well on the Particle doc. Let's move forward to the "minecraft:particle_appearance_billboard" component for now.
- "texture_width" and "texture_height" defines the size of the image file itself.
- "base_UV" in "flipbook" defines the top-left corner of the particle texture. For this particle it's at 0, 0, which is the upper left corner of the image itself. For the second particle, "wiki:pink_hit", "base_UV" will be at 0, 8, which is 8 pixels lower then the first location.
- "size_UV" defines the size of the particle's texture(88) on the image file(which is 1616).
- "step_UV" is how far the flipbook needs to step in order to get the next particle texture. In this case it's 8, 0, which is 8 pixels to the right.
- "frames_per_second" is quite self-explainable. "max_frame" is the total number of frames for the particle.
The second particle, "wiki:pink_hit".
{
	"format_version": "1.10.0",
	"particle_effect": {
		"description": {
			"identifier": "wiki:pink_hit",
			"basic_render_parameters": {
				"material": "particles_alpha",
				"texture": "textures/particle/wiki_particles"
			}
		},
		"components": {
			"minecraft:emitter_rate_steady": {
				"spawn_rate": 520,
				"max_particles": 48
			},
			"minecraft:emitter_lifetime_once": {
				"active_time": 0.15
			},
			"minecraft:emitter_shape_point": {
				"offset": [0.0, "Math.random(-0.9, -0.5)", 0.0],
				"direction": [
					"Math.random(-0.75, 0.75)",
					"Math.random(-1.0, 1.0)",
					"Math.random(-0.75, 0.75)"
				]
			},
			"minecraft:particle_initial_speed": "Math.random(10.0, 20.0)",
			"minecraft:particle_lifetime_expression": {
				"max_lifetime": "6.0 / (Math.random(0.0, 16.0) + 12.0)"
			},
			"minecraft:particle_motion_dynamic": {
				"linear_acceleration": [0, -12.0, 0],
				"linear_drag_coefficient": 10
			},
			"minecraft:particle_appearance_billboard": {
				"size": [
					"0.10 + v.particle_random_1*0.05",
					"0.10 + v.particle_random_1*0.05"
				],
				"facing_camera_mode": "lookat_xyz",
				"uv": {
					"texture_width": 16,
					"texture_height": 16,
					"flipbook": {
						"base_UV": [0, 8],
						"size_UV": [8, 8],
						"step_UV": [8, 0],
						"frames_per_second": 8,
						"max_frame": 2,
						"stretch_to_lifetime": true,
						"loop": false
					}
				}
			},
			"minecraft:particle_appearance_tinting": {
				"color": {
					"gradient": [
						[
							"v.particle_random_1*0.3 + 0.6",
							"v.particle_random_2*0.3+ 0.6",
							"v.particle_random_2*0.3+ 0.6",
							1.0
						],
						["v.particle_random_1*0.3 + 0.6", 0.5, 0.3, 1.0]
					],
					"interpolant": "v.particle_age/v.particle_lifetime"
				}
			},
			"minecraft:particle_appearance_lighting": {}
		}
	}
}
2
3
4
5
6
7
8
9
10
11
12
13
14
15
16
17
18
19
20
21
22
23
24
25
26
27
28
29
30
31
32
33
34
35
36
37
38
39
40
41
42
43
44
45
46
47
48
49
50
51
52
53
54
55
56
57
58
59
60
61
62
63
64
65
66
67
68
69
70
71
72
Done! Now you have two custom particles that can be used in animations!
It's rather tiresome to create particles that way, comparable to creating models without Blockbench. Luckily, you can use Snowstorm, a Visual Particle Generator. It's especially convenient to download the VSC Snowstorm Extension, which is going to create an interactive UI in Visual Studio Code itself for .particle.json files.
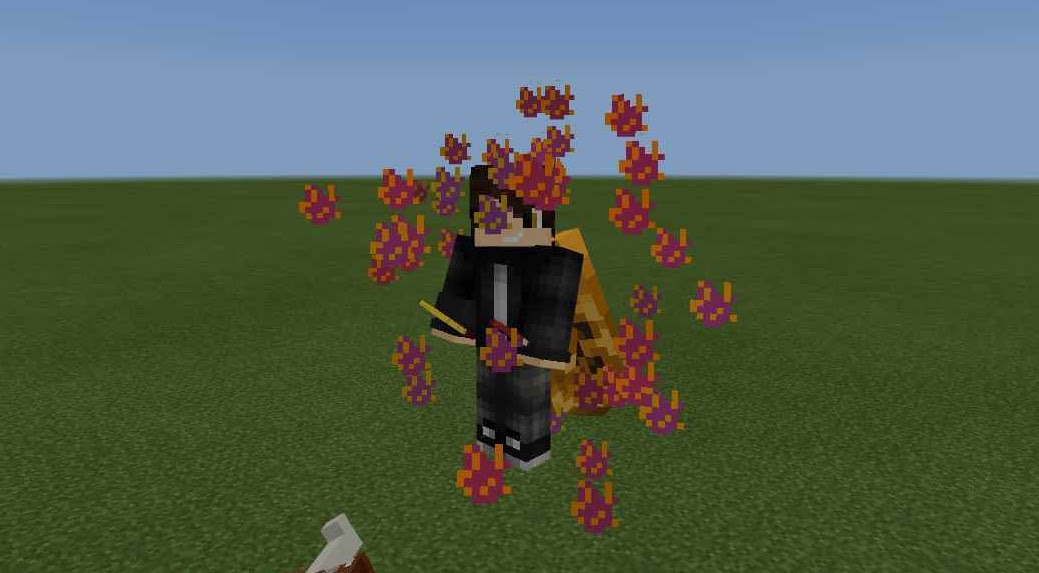
/particle wiki:pink_hit ~ ~2 ~
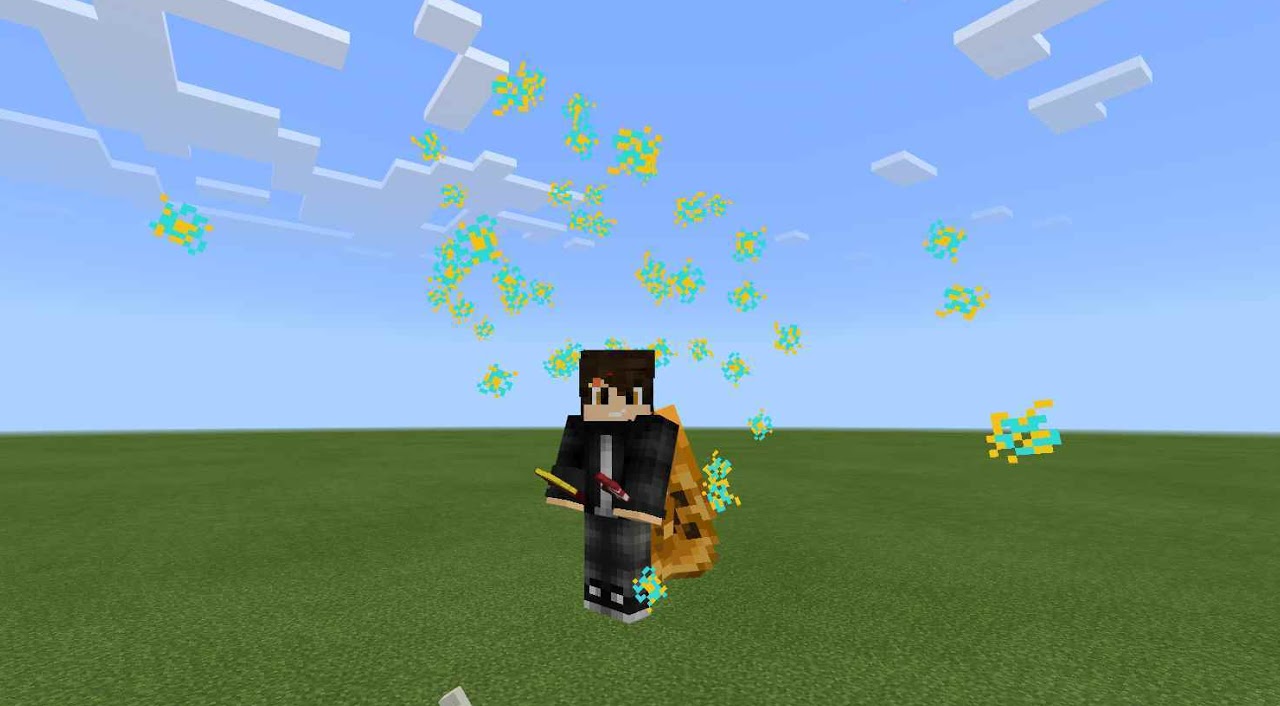
/particle wiki:curvy_particle ~ ~2 ~
Defining Custom Sounds
You can find a more in-depth tutorial on custom sounds on wiki.bedrock.dev.
Minecraft can read sound files in the .ogg (recommended) or .wav format. (You can look up an .mp3 to .ogg converter online). Personally, I usually get my sound effects from ZapSplat.com.
Sound files are located in subfolders of the RP/sounds/ folder. My skele_yaklin sound files are located under RP/sounds/mob/yaklin_moo.ogg and RP/sounds/mob/yaklin_moo_2.ogg. (I don't have more sound effects currently, thus I will be using same ones over and over, but ideally one would need more of those).
Sound Definition
Now to define the sound's shortnames! This process is similar to defining block texture shortnames. It's done in RP/sounds/sound_definitions.json.
{
	"format_version": "1.14.0",
	"sound_definitions": {
		"mob.yaklin.idle": {
			"category": "neutral",
			"max_distance": 12.0,
			"sounds": ["sounds/mob/yaklin_moo", "sounds/mob/yaklin_moo_2"]
		},
		"mob.yaklin.death": {
			"category": "neutral",
			"max_distance": 12.0,
			"sounds": ["sounds/mob/yaklin_moo"]
		},
		"mob.yaklin.hurt": {
			"category": "neutral",
			"max_distance": 12.0,
			"sounds": "sounds/mob/yaklin_moo"
		}
	}
}
2
3
4
5
6
7
8
9
10
11
12
13
14
15
16
17
18
19
20
We have 3 sound shortnames in total:
mob.yaklin.idle, which refers to a random sound file from the "sounds": [] array.mob.yaklin.deathcan be heard from the distance of 12 blocks:max_distance": 12.0.- And, lastly,
mob.yaklin.hurt.
sounds.json
Now we are about to call our sounds. We can do it either through the /playsound <> slash command or automatically in RP/sounds.json. Once again, this resembles block resource definition.
^ the file's structure. I recommend checking out the same file in the Example Resource Pack.
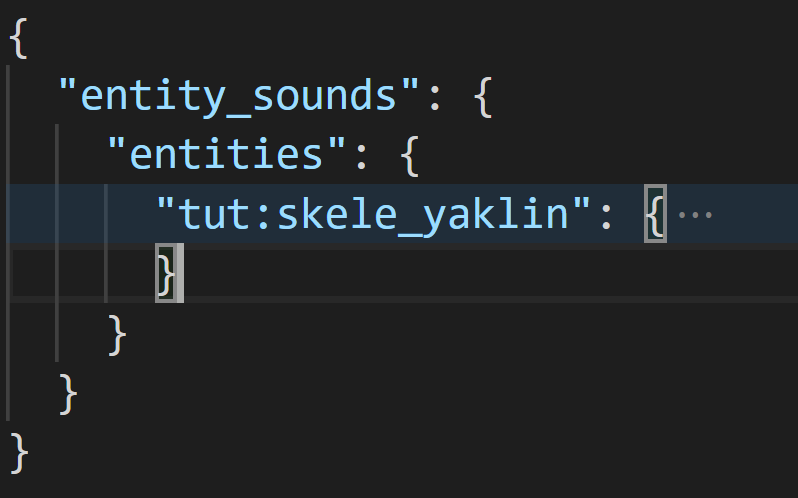
  "wiki:skele_yaklin": {
    "volume": 1.0,
    "pitch": [
      1.0,
      1.0
    ],
    "events": {
      "ambient": "mob.yaklin.idle",
      "hurt": "mob.yaklin.hurt",
      "death": "mob.yaklin.death",
      "step": {
        "sound": "mob.cow.step",
        "volume": 0.15,
        "pitch": 1.0
      }
    }
  }
2
3
4
5
6
7
8
9
10
11
12
13
14
15
16
17
Let's see how the sounds of the skele_yaklin are called in the entity's object.
- The first "volume" and "pitch" are global, they are the starting point for every other of the entity's sounds. If you want the sounds to play exactly how they are, set both of them to 1;
- "events" include the automatic sounds to be played. There are a couple Vanilla events that will trigger automatically(you can see the whole list on the wiki.bedrock.dev page linked bove). All of the events call a sound's shortname.
- "ambient" plays occasionally, for example the sheep "baah" sound.
- "hurt" plays when the entity is hurt.
- "death" plays on death.
- "step" is the sound of the mob walking. I used the cow step sound, already included in the base game.
That's it! Turn up your Sound volume in Settings>Audio, spawn in your mobs, and listen to the melodic cacophony of their new voices!
Your progress so far
What you've done:
- Learned to include Particles in Animations
- Created two Custom Particles and learned to create more
- Defined custom Sounds for your custom entity;
What are you to do next:
- Create custom biomes
- Create custom generated Structures
- Be introduced to Scripting