Emojis & Symbols
WARNING
Modifying texture of vanilla emojis and symbols on this page are incompatible with Nintendo Switch platform!
Emojis are not supported by Ore UI screens.
Minecraft has a bunch of hard-coded Private Use Unicode symbols that it automatically converts to Emoji-like symbols. These can be used anywhere where normal letters can - signs, books, item names, chat, etc.
Below you can find platform specific Emoji's, as well as general symbols. Copy/paste the "box" character under the Letter colum directly into Minecraft. You can also use the input key using /titleraw or /tellraw.
There will be instructions for creating custom emoji at the bottom.
Vanilla Emojis
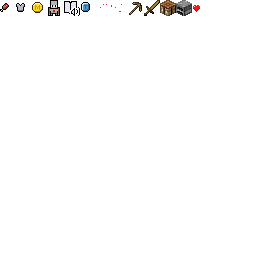
HUD
| Name | Letter (Copy/Paste This) | Unicode | Image |
|---|---|---|---|
| Food | | U+E100 |  |
| Armor | | U+E101 |  |
| Heart | | U+E10C |  |
Items & Blocks
| Name | Letter (Copy/Paste This) | Unicode | Image |
|---|---|---|---|
| Wooden Pickaxe | | U+E108 |  |
| Wooden Sword | | U+E109 |  |
| Crafting Table | | U+E10A |  |
| Furnace | | U+E10B |  |
Marketplace
| Name | Letter (Copy/Paste This) | Unicode | Image |
|---|---|---|---|
| Minecoin | | U+E102 |  |
| Token | | U+E105 |  |
Inventory
| Name | Letter (Copy/Paste This) | Unicode | Image |
|---|---|---|---|
| Craft Toggle On | | U+E0A0 |  |
| Craft Toggle Off | | U+E0A1 |  |
New Touch
| Name | Letter (Copy/Paste This) | Unicode | Input Key | Image |
|---|---|---|---|---|
| Jump | | U+E014 | :tip_virtual_button_jump: |  |
| Attack | | U+E015 | :tip_virtual_button_action_attack_or_destroy: |  |
| Joy Stick | | U+E016 | :tip_virtual_joystick: |  |
| Place | | U+E018 | :tip_virtual_button_action_build_or_use: |  |
| Sneak | | U+E019 | :tip_virtual_button_sneak: |  |
| Sprint | | U+E01A | :tip_virtual_button_sprint: |  |
| Fly Up | | U+E01B | :tip_virtual_button_fly_up: |  |
| Fly Down | | U+E01C | :tip_virtual_button_fly_down: |  |
| Dismount | | U+E01D | :tip_virtual_button_dismount: |  |
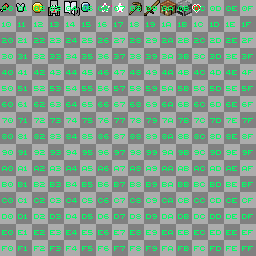
Touch
| Name | Letter (Copy/Paste This) | Unicode | Input Key | Image |
|---|---|---|---|---|
| Jump | | U+E084 | :touch_jump: |  |
| Crouch | | U+E085 | :touch_sneak: |  |
| Fly Up | | U+E086 | :touch_fly_up: |  |
| Fly Down | | U+E087 | :touch_fly_down: |  |
| Stop Flying | | U+E088 | :touch_stop_flying: |  |
| Left Arrow | | U+E081 | :touch_left: | |
| Right Arrow | | U+E083 | :touch_right: | |
| Up Arrow | | U+E080 | :touch_forward: | |
| Down Arrow | | U+E082 | :touch_back: | |
| Small Jump | | U+E059 | :tip_touch_jump: |  |
| Small Crouch | | U+E05A | :tip_touch_sneak: |  |
| Small Fly Up | | U+E05C | :tip_touch_fly_up: |  |
| Small Fly Down | | U+E05D | :tip_touch_fly_down: |  |
| Small Left Arrow | | U+E056 | :tip_touch_left: |  |
| Small Right Arrow | | U+E058 | :tip_touch_right: |  |
| Small Up Arrow | | U+E055 | :tip_touch_forward: |  |
| Small Down Arrow | | U+E057 | :tip_touch_back: |  |
| Small Inventory | | U+E05B | :tip_touch_inventory: |  |
Keyboard & Mouse
| Name | Letter (Copy/Paste This) | Unicode | Input Key | Image |
|---|---|---|---|---|
| Left Click | | U+E060 | :mouse_left_button: |  |
| Right Click | | U+E061 | :mouse_right_button: |  |
| Middle Click | | U+E062 | :mouse_middle_button: |  |
| Small Left Click | | U+E070 | :light_mouse_left_button: |  |
| Small Right Click | | U+E071 | :light_mouse_right_button: |  |
| Small Middle Click | | U+E072 | :light_mouse_middle_button: |  |
| Small Mouse | | U+E073 | :light_mouse_button: |  |
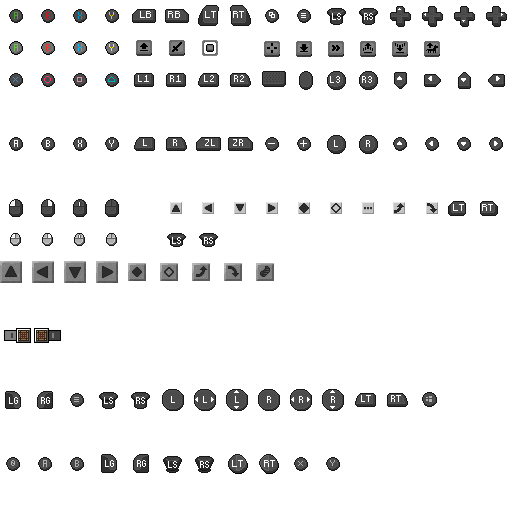
Xbox
| Name | Letter (Copy/Paste This) | Unicode | Image |
|---|---|---|---|
| Y | | U+E003 |  |
| B | | U+E001 |  |
| A | | U+E000 |  |
| X | | U+E002 |  |
| Back | | U+E008 |  |
| Start | | U+E009 |  |
| LB (Left Bumper) | | U+E004 |  |
| RB (Right Bumper) | | U+E005 |  |
| LT (Left Trigger) | | U+E006 |  |
| RT (Right Trigger) | | U+E007 |  |
| LS (Left Stick) | | U+E00A |  |
| RS (Right Stick) | | U+E00B |  |
| D-pad Up | | U+E00C |  |
| D-pad Right | | U+E00F |  |
| D-pad Down | | U+E00E |  |
| D-pad Left | | U+E00D |  |
Nintendo Switch
| Name | Letter (Copy/Paste This) | Unicode | Image |
|---|---|---|---|
| X | | U+E042 |  |
| A | | U+E040 |  |
| B | | U+E041 |  |
| Y | | U+E043 |  |
| + | | U+E049 |  |
| - | | U+E048 |  |
| L (Left Bumper) | | U+E044 |  |
| R (Right Bumper) | | U+E045 |  |
| ZL (Left Trigger) | | U+E046 |  |
| RL (Right Trigger) | | U+E047 |  |
| L (Left Stick) | | U+E04A |  |
| R (Right Stick) | | U+E04B |  |
| D-pad Up | | U+E04C |  |
| D-pad Right | | U+E04F |  |
| D-pad Down | | U+E04E |  |
| D-pad Left | | U+E04D |  |
PlayStation (4/5)
| Name | Letter (Copy/Paste This) | Unicode | Image |
|---|---|---|---|
| Triangle | | U+E023 |  |
| Circle | | U+E021 |  |
| Cross | | U+E020 |  |
| Square | | U+E022 |  |
| Options/Share | | U+E029 |  |
| Touch Pad | | U+E028 |  |
| L1 (Left Bumper) | | U+E024 |  |
| R1 (Right Bumper) | | U+E025 |  |
| L2 (Left Trigger) | | U+E026 |  |
| R2 (Right Trigger) | | U+E027 |  |
| L3 (Left Stick) | | U+E02A |  |
| R3 (Right Stick) | | U+E02B |  |
| D-pad Up | | U+E02C |  |
| D-pad Right | | U+E02F |  |
| D-pad Down | | U+E02E |  |
| D-pad Left | | U+E02D |  |
Oculus (Rift/Rift S)
| Name | Letter (Copy/Paste This) | Unicode | Image |
|---|---|---|---|
| 0 | | U+E0E0 |  |
| B | | U+E0E2 |  |
| A | | U+E0E1 |  |
| Y | | U+E0EA |  |
| X | | U+E0E9 |  |
| LG (Left Grip) | | U+E0E3 |  |
| RG (Right Grip) | | U+E0E4 |  |
| LT (Left Trigger) | | U+E0E7 |  |
| RT (Right Trigger) | | U+E0E8 |  |
| LS (Left Stick) | | U+E0E5 |  |
| RS (Right Stick) | | U+E0E6 |  |
Windows MR (Mixed Reality)
| Name | Letter (Copy/Paste This) | Unicode | Image |
|---|---|---|---|
| Menu | | U+E0C2 |  |
| Windows | | U+E0CD |  |
| Left Touchpad | | U+E0C5 |  |
| Left Horizontal Touchpad | | U+E0C6 |  |
| Left Vertical Touchpad | | U+E0C7 |  |
| Right Touchpad | | U+E0C8 |  |
| Right Horizontal Touchpad | | U+E0C9 |  |
| Right Vertical Touchpad | | U+E0CA |  |
| LT (Left Trigger) | | U+E0CB |  |
| RT (Right Trigger) | | U+E0CC |  |
| LG (Left Grab) | | U+E0C0 |  |
| RG (Right Grab) | | U+E0C1 |  |
| LS (Left Stick) | | U+E0C3 |  |
| RS (Right Stick) | | U+E0C4 |  |
Other
| Name | Letter (Copy/Paste This) | Unicode | Image |
|---|---|---|---|
| Crosshair | | U+E017 |  |
| Agent | | U+E103 |  |
| Immersive Reader | | U+E104 |  |
| Hollow Star | | U+E106 |  |
| Solid Star | | U+E107 |  |
Additional Input Keys
Input keys can be used to automatically detect the input of the player and be used with /titleraw or /tellraw with the text component.
Below are the results of default keybindings. All text below, including "Unassigned", is literal and will display that text to the player.
| Name | Input Key | Keyboard & Mouse | Touch | Xbox | Nintendo Switch | Playstation (4/5) |
|---|---|---|---|---|---|---|
| Jump | :_input_key.jump: | SPACE | | | | |
| Sneak | :_input_key.sneak: | SHIFT | | | | |
| Sprint | :_input_key.sprint: | CONTROL | Unassigned | | | |
| Forward | :_input_key.forward: | W | Unassigned | Unassigned | Unassigned | |
| Back | :_input_key.back: | S | Unassigned | Unassigned | Unassigned | |
| Left | :_input_key.left: | A | Unassigned | Unassigned | Unassigned | |
| Right | :_input_key.right: | D | Unassigned | Unassigned | Unassigned | |
| Attack | :_input_key.attack: | | Unassigned | | | |
| Inventory | :_input_key.inventory: | E | Unassigned | | | |
| Cycle Item Left | :_input_key.cycleItemLeft: | Unassigned | Unassigned | | | |
| Cycle Item Right | :_input_key.cycleItemRight: | Unassigned | Unassigned | | | |
| Use | :_input_key.use: | | Unassigned | | | |
| Drop | :_input_key.drop: | Q | Unassigned | | | |
| Code Builder | :_input_key.codeBuilder: | Unassigned | Unassigned | Unassigned | Unassigned | Unassigned |
Custom Emojis
NOTE:
This method is not officially supported. While many creators use it on the Marketplace, caution is advised.
To make a custom emoji, we use a very similar method to the pre-built emoji, except instead of using the Microsoft sprite-sheets, we overwrite them with our own! Some character-slots are already used up with the emojis above, but there are blank slots we can use.
To get started, download the sprite-sheets below, and move them into the fonts folder.
Two sprite sheets are provided for each glyph target: one annotated with hex information for easily find the correct character, and a second version that accurately reflects Vanilla. To avoid numbers over existing emojis, use the second version. Below, you'll also find an edited sample with some custom emojis for free-use.
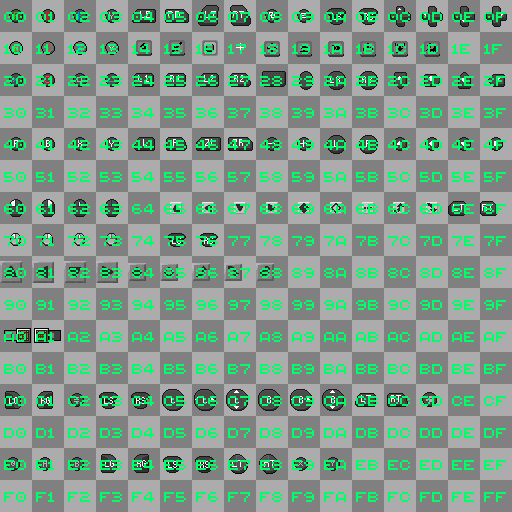
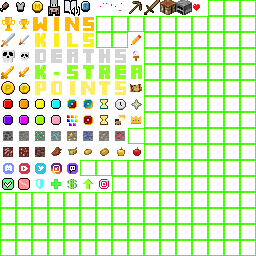
Glyph E0
Glyph E1
Edited sample glyph_E1.png (CC0), shared by @zheaEvyline for free use:
If you'd like to add existing Vanilla items to the glyph and use them as emojis in-game, you can easily do so with the Items to Glyph Web Tool created by @Minato
Your filepath should look like this:
- 🖼️glyph_E0.png
- 🖼️glyph_E1.png
TIP
E0 and E1 aren't the only code points available to achieve custom emojis.
You can also use E2, E3, E4, E5, E6, E7, E8, E9, EA, EB, EC, ED, EE, EF, F0, F1, F2, F3, F4, F5, F6, F7, and F8, as these aren't being used by Vanilla.
Using these code points can also help reduce conflicts with other packs to some extent.
Using the Emojis In-Game
Once you have your custom emojis inside the glyph_E0.png or glyph_E1.png, you need to obtain it's corresponding letter/symbol which you will be able to copy-paste to display the emoji in-game using the converter below.
The first two characters of the input are E0, E1, or any other code point, depending on which file you added emojis to.
The next two characters are the position inside the image in the format <row><column>, where each character is a number in hexadecimal numeral system. You can find this number by referencing the images above. For example, the top-right square in E0 is 0F, and the bottom right is FF.
So, after you are done, it might look like E102 (E1 + 02).
Copy this code into the following field, and press Convert. The symbol on the right-hand side can be copy/pasted into Minecraft.
Alternatively, you can obtain the letter/symbol at this website here or with the help of this Glyph Web Tool made by @NhanAZ.
Positioning the Emoji
- To position an emoji upwards/downwards, simply move it up/down within its own emoji slot.
- To position an emoji towards the left or right, simply add any pixel of 5-10% opacity to its side (within its own slot), opposite to the direction you want to move it.
- Ex: to move an emoji to the right by 2 pixels, add any 5-10% opacity pixel connecting to it, anywhere on its left-most side and add another one to the left of that pixel.
Note: The following steps apply only to emojis that do not fill their slot width (i.e., are smaller than the slot size).
Glyph Separation Space
Sometimes, displaying two glyphs close together in-game may leave a few empty pixels between them. The only way to fix this is by scaling the glyph (PNG file) so that your emoji, which originally spans multiple slots, fits within a single slot.
For example, if you created an emoji in the glyph_E1 file using two 16×16 slots, you would need to double the resolution of the default file (from 256×256 to 512×512). Then, simply align your 16×32 emoji into one of the 32×32 slots in the scaled glyph file.
Resizing the Emoji
To resize the emoji, change the resolution of the glyph (PNG file) to 512×512. The reason for doubling the resolution is that it increases the number of pixels, providing more room for editing. Once you've done this, open an image editor of your choice, select the new emoji, resize it, and center it within the emoji slot. This will give the emoji more space around it when used in the game.
Contributors


