Project Setup Android
Tools
It is not easy to find good apps to make add-ons for android platform, but we tried our best and collected Google Play apps for you. For development on Android, you'll need a combination of 3 applications.
- A file manager that can create ZIP archives if your device is running Android 12 or newer.
- A code editor (any text editor will work, but only code editors will show syntax highlights).
- An image editor (no device comes with a editor that can go down to the pixels).
File Managers
These file managers are known to have ZIP archiving and view-only access to the Android/data folder:
Zarchiver - a versatile archive manager that supports a wide range of compression formats (ZIP, 7z, RAR, etc.) and allows users to create, extract, and manage compressed files. It features options for password-protected archives, partial archive extraction, and multi-threading for faster performance. On rooted devices or while using Shizuku, Zarchiver can access and modify files in Android/data and system directories, making it ideal for advanced file management.
X-Plore - a powerful file manager with dual-pane tree view, a built-in text editor (not code), several file compression formats (ZIP, 7zip, RAR, etc.), and more. On rooted devices, X-Plore has edit access to
Android/dataand root directories.Total Commander - not as powerful out of the box compared to X-Plore, but contains some of the same features including dual pane, ZIP and RAR archives, and view-only access to
Android/data. Total Commander has list view instead of tree and many other features that require plugins (apps from Google Play) to use.
Code Editors
- Acode: Free version comes with ads that can be toggled off without paying. Supports GitHub integration using a Personal Access Token, FTP/SFTP, syntax highlighting for over 100+ languages including JSON, tab-view for multi-file editing, dozens of themes, and more. This app is open source and does have a paid version that allows a much deeper theme customization.
INFO
Acode is the only powerful code editor actively being developed on Android at this time. Other editors are very limited or have been abandoned long enough to vanish from the Google Play store. If you know of a code application, you can contribute to this guide.
Image Editors
- Pocket Paint - lightweight editor with the bare minimum features needed for any add-on creation. This app is easy to use and allows importing other images over others. Saves in JPG (compressed), PNG (lossless, with transparency), and ORA (multi-layer images). This app is open source.
- PixaPencil - very lightweight, no ads or in app purchases. Plentiful tools and customizable brushes, ability to save palettes internally or externally although only available in F-droid, Allows for some easy quick textures.
- Pix2D - a simple lightweight app. Would be the best if you need just to draw some texture-placeholder or edit some small textures and it does allow for making animations.
Your Workspace
TIP
In this version of the guide, "BP" refers to your behavior pack folder and "RP" refers to your resource pack folder in your workspace. For locations in files or directories, ../<current location> indicates "From last location" followed by the added space (e.g.: /one/two/three/file.txt would be shortened to ../three/file.txt)
If your device is rooted or you have setup Shizuku, you can follow the main project setup using the /Android/data/com.mojang.minecraftpe/files/games/com.mojang here development behavior and resource pack folders directly. Otherwise, follow the steps below or Setup Shizuku.
Before we begin, you need a workspace. Using your file manager, navigate to your Internal Storage (In most cases, it's /. In others, the full path (e.g.: /storage/emulated/0/) is displayed. Both are acceptable.) and create a folder that will contain your packs. For this example, our full directory is /Minecraft Packs/MyFirstAddon. From there, you'll need one folder for both your behavior and resource packs (e.g.: ../MyFirstAddon/addonBP and ../MyFirstAddon/addonRP).
Now that you have the workplace setup, code editors should have a way for you to open a folder as a workplace. In this guide, we'll be walking through Acode.
- Open Acode.
- Tap the file browser button (3 bars in the top-left), followed by "Open folder"
- Tap "Add a storage", followed by "select folder"
- This should have opened your device's file browser. Navigate to the main folder for your projects (for us,
/Minecraft Packs) then tap "Use this folder". If your device asked you to allow Acode access, tap "Allow". - You should be back in Acode now. Tap "OK" and your folder should now be in the list. Tap on it and then "Select Folder" on the bottom of the screen.
- Now when you open the file browser (3 bars in top-left), you should see your folder in the list. You now have quick access to your add-on's behavior and resource pack folders. The file browser uses tree view to display your active workspace.
TIP
You can create new files and folders inside your packs from the file browser by tapping and holding on the folder you want to create the item in.
Shizuku
TIP
Shizuku only works With Dev mode enabled and needs to be started after restart. You also need Android 11 or higher for Shizuku to work.
This Section is optional. if you want to be able to use development folders without rooting your device then Shizuku might help you Shizuku allows you to write to Android/data if it's running and your using a supported file manger like Zarchiver.
To setup it app first enable developer mode this process differs from phone to another
open dev options and enable USB debug and wireless debugging open Shizuku Click Pairing Developer options scroll down untill you see wireless debugging enable it and then click on it click pair with code and enter the code in the notification.
Now start Shizuku.
BP & RP Manifests
WARNING
From here on out, all files and folders have very specific names unless otherwise noted. Wrongly named files and/or folders are a common reason of an error. Please ensure you're checking your work carefully in accordance to the examples provided. If a file or folder mentioned has not yet been created, please create it in it's appropriate directory.
When creating a new file in a file manager or some text or code applications, the .txt extension is added automatically to the end of the file name. To ensure our files work as intended, be sure to remove .txt. Like names, the wrong file extension is also a common reason of an error. If you're using Acode, you'll notice untitled.txt is completely highlighted instead of just untitled. This is a common practice for naming programming language files.
The manifest file is the file Minecraft uses to identify your packs. Every pack has one (and only one) manifest. A folder with a correctly formatted manifest will show up in Minecraft. Before we begin adding content, we will ensure our "minimal" pack is visible. Manifests are written in the JSON programming language. If you're unfamiliar with JSON, you can learn more about it here.
Create a new text file in your add-on's behavior pack folder called manifest.json. To begin, copy and paste the following code into the manifest.json file. A full breakdown of the manifest file is provided after creating these files.
{
    "format_version": 2,
    "header": {
        "name": "pack.name",
        "description": "pack.description",
        "uuid": "...",
        "version": [0, 0, 1],
        "min_engine_version": [1, 16, 0]
    },
    "modules": [
        {
            "type": "data",
            "uuid": "...",
            "version": [0, 0, 1]
        }
    ]
}Now create another manifest.json file in your add-on's resource pack folder. Again, copy and paste the following code inside the new file.
{
    "format_version": 2,
    "header": {
        "name": "pack.name",
        "description": "pack.description",
        "uuid": "...",
        "version": [0, 0, 1],
        "min_engine_version": [1, 16, 0]
    },
    "modules": [
        {
            "type": "resources",
            "uuid": "...",
            "version": [0, 0, 1]
        }
    ]
}Manifest Breakdown
format_versiondefines the version the syntax your manifest is written in. Version 2 is the most recent stable version. Always use this version.nameis name of your pack. We will be defining the this in "code form" later so they can easily be translated into other languages, should you create a pack with multiple languages.descriptionis a short description about your pack that will show up under thenamein-game. This will also be defined later in "code form".uuidis required to help identify your pack from other packs and will have a breakdown of it's own below. Once explained, you'll need to replace all of the...with them.versionis literally the version of your add-on. Upon completing your add-on, you can always change this to[1, 0, 0]. However, it'll be easier to use the hotfix spot while making your changes on mobile.min_engine_versiontells Minecraft what the minimum version it needs to be in order for your pack to work. For example, if your pack has a crafting recipe that involves concrete, your pack can't run on Minecraft 1.5 because concrete doesn't exist in that version.- Under
modules, you have thetypefield. This tells Minecraft what your pack is. Sodatain your BP tells the game that pack is a behavior pack andresourcesin your RP tells the game that pack is a resource pack.
UUID Breakdown
A UUID, or Universally Unique IDentifier, both identifies your pack for other programs (Minecraft, for example) and separates your pack from someone else's pack for the program it's for. A version 4 UUID (UUID-4) is usually in the format xxxxxxxx-xxxx-xxxx-xxxx-xxxxxxxxxxxx and made of a random string of letters and numbers. For example: 5c830391-0937-44d6-9774-406de66b6984.
You should NEVER use the same UUID twice! Use the Online UUID Generator Tool to generate the UUID's needed for your manifest files. Every manifest file uses two different UUID's. So to ensure your packs will work correctly, get 4 different UUID's to replace all of the ... in both manifests. When finished, each UUID entry should look similar like this: "uuid": "5c830391-0937-44d6-9774-406de66b6984
Pack Icon
Notice how other packs have a icon? It's a image file which can quickly identify how your add-on will appear in-game. Got a low-resolution square image as a PNG? You can use it! Otherwise, you can use this example icon.
You must place a copy of your desired image in both the behavior and resource packs. In order for the image to be read correctly, the name must be pack_icon.png.
Language Files
Remember when we said we'll define the pack name and description in code form earlier? Now is that time as it's the last thing we need to do to setup your add-on. You will need to create 4 new files and 2 new folders (2 files and 1 folder for each pack). You can You can learn more about how Minecraft handles localization here. You can also format your definitions using the § symbol. You can view a list of colors and formats here. If you use any formatting, make sure you §reset when changing formats: §kl My pack l will render "My pack" unreadable whereas §kl §rMy pack §kl can be read properly.
pack.name=§2My §lFIRST §r§2Add-on's Behavior Pack!
pack.description=This add-on is made by a Wiki Contributor!["en_US"]pack.name=§2My §lFIRST §r§2Add-on's Resource Pack!
pack.description=This add-on is made by a Wiki Contributor!["en_US"]Importing Your Add-on
Now that your add-on has all of the required content, we need to import it to Minecraft. To do this, we need to create a file with the extension .mcaddon.
- Open your preferred file manager and navigate to the folder containing your behavior and resource packs.
- Using multi-select, select both packs and create a ZIP file.
- When asked for the name of the file, ensure that
.zipis changed to.mcaddon.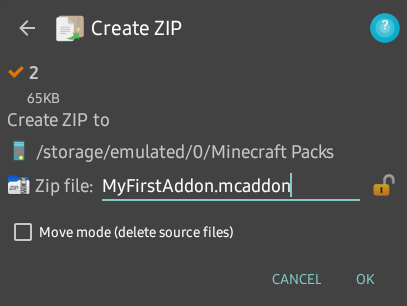
- When your file manager finishes, it should be a
MCADDONfile with Minecraft as it's icon. Tapping on this file should launch Minecraft.
If done correctly, Minecraft will display a banner for both packs. First is Importing.... After should be Successfully imported "<your pack name>". You can also go to Settings > Storage if you don't see the import messages to verify your packs were imported. If you do not see either pack, check out our troubleshooting guide.
Turn on Content Log
WARNING
Content log is the most useful tool you have for debugging your add-ons. Please do not skip this step.
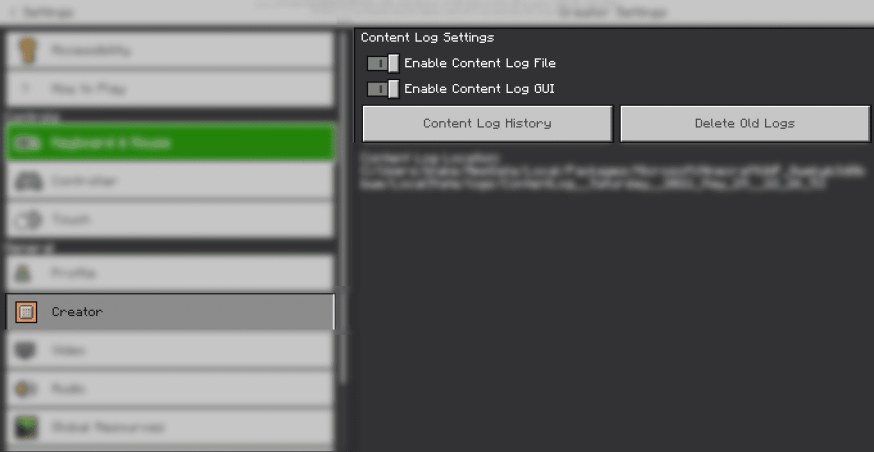
Content Log is an extremely important debugging tool, which you should always have on.
Turn on both content log settings in settings > creator. This will show you any errors in your add-on when you enter a world with it applied. You can also open the content log GUI in-game by pressing ctrl+h. Learn more about the content log here.
Creating Your Testing World
Now we create a world to test your new add-on!
Click "Create new world";
Ensure that the following settings are set.

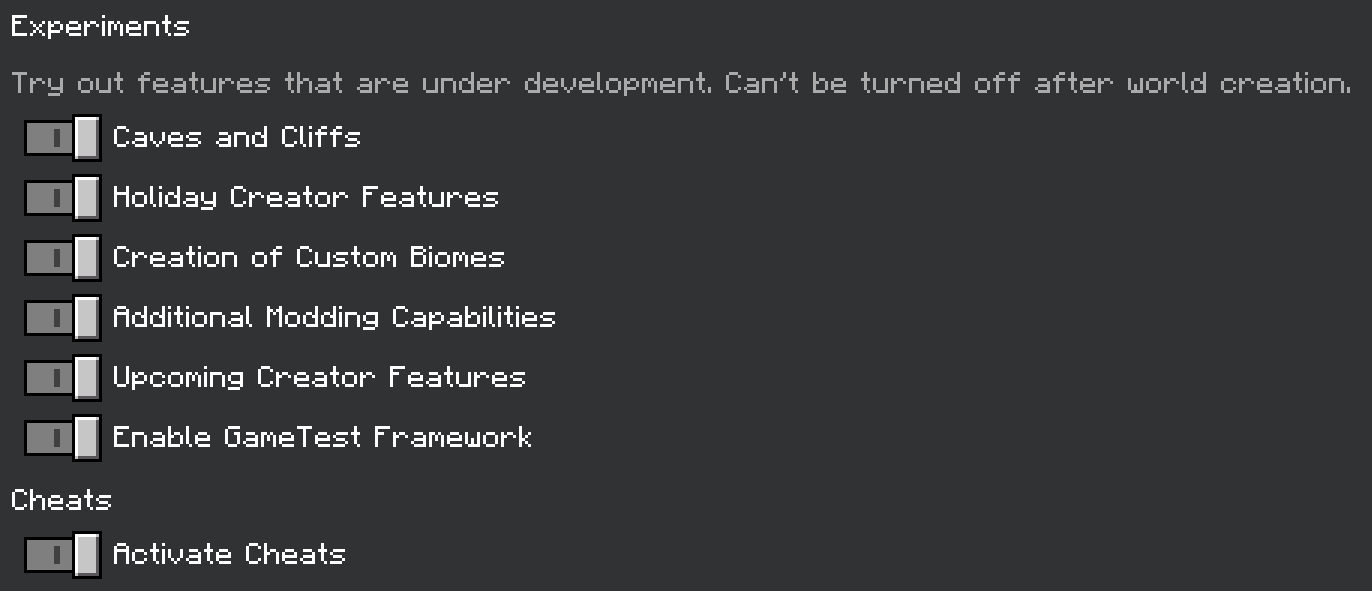
Now activate your behavior pack, and your resource pack. You can do this by selecting the packs, and clicking 'apply'.
Now click 'Create'!
Final Notes
Here is how your project should look, after completing this page:
Remember that in future, we will represent com.mojang/development_behavior_packs/guide_RP/ as RP, and com.mojang/development_behavior_packs/guide_BP/ as BP.
- manifest.json
- pack_icon.png
- en_US.lang
- languages.json
- manifest.json
- pack_icon.png
- en_US.lang
- languages.json
What You Have Learned
What you have learned:
- What and where your
com.mojangfolder is and what it contains - How to setup your mobile workspace
- What a
manifest.jsonfile is - What are UUID's and how to use them
- How to create icons for your add-ons
- What a
.langfile is
Your Progress So Far
- Setup your pack
- Create a custom item
- Create a custom entity
- Create a custom block
Contributors


