Project Setup
Introduction
This page will guide you through the steps required to create your first "working" add-on and view it in game. If you're joining on android, you should follow this alternative guide:
Android guideThe com.mojang Folder
The com.mojang folder is a special folder where Minecraft stores data (Add-ons, Worlds, Player info...). Minecraft understands this location, and all files we access or create will be placed somewhere in this folder!
You should create a shortcut to the com.mojang folder on your Desktop or on your mobile device, so you can easily access it at any time. The exact location of the com.mojang folder will depend on your device OS.
Windows
On Windows, there are multiple com.mojang folders in order to accommodate having different content (such as worlds) and settings available when logged into Minecraft with different Xbox accounts. Packs that are in development should be saved in the "Shared" com.mojang folder which can be found at:
C:\Users\<USERNAME>\AppData\Roaming\Minecraft Bedrock\Users\Shared\games\com.mojang
USING PATH VARIABLES
You can make use of the APPDATA variable to jump directly to your AppData\Roaming folder.
Simply type/paste %APPDATA%\Minecraft Bedrock\Users\Shared\games\com.mojang into the File Explorer address bar to find your com.mojang folder.
Android
Android 11 or older: Phone > games > com.mojang
Android 12 and newer: Phone > Android > data > com.mojang.minecraftpe > files > games > com.mojang
ChromeOS
Before you can see the com.mojang in your files, make sure to change the File Storage Location to External in your Minecraft Settings:
- Go to
Minecraft Settings. - Navigate to
Settings > General > Storage. - Change the
File Storage LocationtoExternal.
After that you can access the com.mojang folder in your Android Subsystem:
My Files > Play Files > Android > data > com.mojang.minecraftpe > files > games > com.mojang
iOS
My iDevice > Minecraft > games > com.mojang
Development Packs
We will develop our add-on in development_behavior_packs and development_resource_packs. When you make changes within these folders, you can exit and re-enter a world with the packs applied, to automatically reload the content. This allows you to quickly test your add-on without reloading Minecraft.
RELOAD ALL
A quicker shortcut for reloading a world is the /reload all command.
resource_packs and behavior_packs on the other hand contain stable add-ons, including those imported via .mcpack. We can ignore these folders for now.
Your Workspace
TIP
In this guide, BP refers to the folder you created in development_behavior_packs ("the behavior pack"), and RP refers to the folder you created in development_resource_packs ("the resource pack")
First of all, you will need to create the proper folders in suitable locations and set up your workspace. The remainder of this guide assumes you are using VSCode. You may also follow along with other editors.
Let's create your first add-on workspace in Visual Studio Code now.
- Open VSCode (Visual Studio Code, the code editor)
- Create a folder named "
your_pack_name_RP" indevelopment_resource_packs. We will refer to this folder asRP - Create a folder "
your_pack_name_BP" indevelopment_behavior_packs. We will refer to this folder asBP. - Go to
File > Add folder to workspace...and chooseBP. Do the same withRP. - Press
File > Save Workspace as...to save the workspace file to your Desktop. Whenever you're working on your add-on, all you have to do is open the workspace by double-clicking, and you will get quick access to both BP and RP folders.
BP Manifest
CREATING FILES
In this guide, you will often be instructed to create files with specific names, placed in specific folders. If the folder doesn't exist yet, please create it!
The manifest is a file that identifies your pack to Minecraft. Every pack has one manifest. A folder with a correctly formatted manifest will show up in Minecraft, and we consider this the "minimal" pack before we can add additional content.
Manifest files are written in JSON. If this isn't familiar to you, you can learn more about json here.
First, create a new file in your BP folder by right-clicking on the folder and selecting New File Call the file manifest.json and paste the following code into the file to begin with.
{
    "format_version": 3,
    "header": {
        "name": "pack.name",
        "description": "pack.description",
        "uuid": "...",
        "version": "1.0.0",
        "min_engine_version": "1.26.30"
    },
    "modules": [
        {
            "type": "data",
            "uuid": "...",
            "version": "1.0.0"
        }
    ],
    "metadata": {
        "authors": ["Your Name"],
        "product_type": "addon"
    }
}Manifest Explained
format_versiondefines what version of manifest JSON format you are using. Version 3 is the most recent stable version; use it.nameis the name of your behavior pack.descriptionwill show up under it in-game.We are defining these fields as localization keys so we can translate them later into other languages. For more information about localization, look here.
The
uuidfield is essential, and will be discussed in more detail below.versiondefines the version of your add-on.This allows users to import updated versions of your add-on without encountering a "Duplicate pack detected" error. You don't need to change the version if you have the add-on in
development_*_packsfolders and only use them on private worlds.min_engine_versiondefines the minimum Minecraft client version that'll be able to use your add-on. The number specified here should match the current version of the game, unless you're planning for backwards compatibility with older versions.In
modules, a module with thetypeof"data"is added. This makes your pack a behavior pack.In
metadata, theproduct_typeallows your add-on to enable achievements on your world. It must be a product type of"addon".
UUID Explained
A UUID (Universally Unique Identifier) identifies your pack for other programs (in this case, Minecraft) to read. It looks something like this: 5c830391-0937-44d6-9774-406de66b6984
NEVER USE THE SAME UUID TWICE. You can generate your own UUIDs here or, if you use VSCode, you can install this extension. Many other tools like bridge. generate UUIDs automatically. Every manifest file uses at least two different UUIDs, or more if the pack has multiple modules (such as when adding scripts).
To ensure that your add-on will work correctly you should generate two new UUID's which you will paste into the BP manifest.json file, at each "...". When you are finished, it should look something like this:
"uuid": "5c830391-0937-44d6-9774-406de66b6984"RP Manifest
The next step is to create the manifest.json for the RP. The format for a resource pack manifest is nearly identical to a BP manifest except that the module type is "resources", which marks the pack as a resource pack. Additionally, we specify a pack_scope of "world" which prevents the pack from being activated outside of worlds.
Copy the following code into your newly created RP/manifest.json and insert your own UUIDs.
{
    "format_version": 3,
    "header": {
        "name": "pack.name",
        "description": "pack.description",
        "uuid": "...",
        "version": "1.0.0",
        "min_engine_version": "1.26.30",
        "pack_scope": "world" // Can be "any" (default), "global" or "world"
    },
    "modules": [
        {
            "type": "resources",
            "uuid": "...",
            "version": "1.0.0"
        }
    ],
    "metadata": {
        "authors": ["Your Name"],
        "product_type": "addon"
    },
    "capabilities": ["pbr"] // Allows Vibrant Visuals to be enabled while this pack is activated.
}Pack Icon
The pack icon is an image file which identifies how your add-on will look in-game. If you have a low-resolution square image, you can use it. Otherwise, download and use this example icon:
You should place a copy of your desired image into both the RP and the BP. The image needs to be named pack_icon.png
Language Files
The last thing to do is setup language support for your add-on. You will need to create a language file for both the RP and the BP (note that the BP translations are only used by the BP manifest, all other translations such as item names go in the RP). You can learn more about how Minecraft handles localization here.
pack.name=Wiki Resource Pack
pack.description=A Ghostly Guidepack.name=Wiki Behavior Pack
pack.description=A Ghostly Guide["en_US"]["en_US"]Checking Your Work
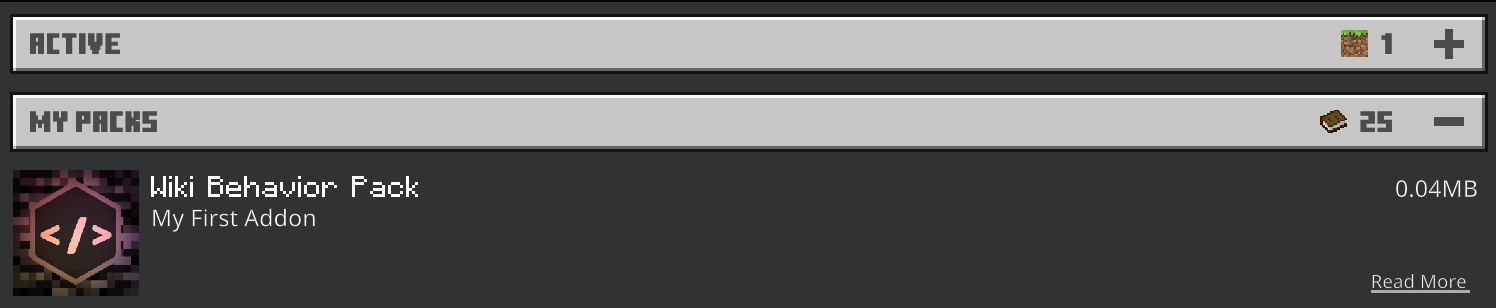
If you have done everything correctly, your packs should show up in Minecraft now! If you don't see your pack, you should follow the troubleshooting guide.
Enabling the Content Log
Content Log
Content log is the most useful tool you have for debugging your add-ons. Please do not skip this step!
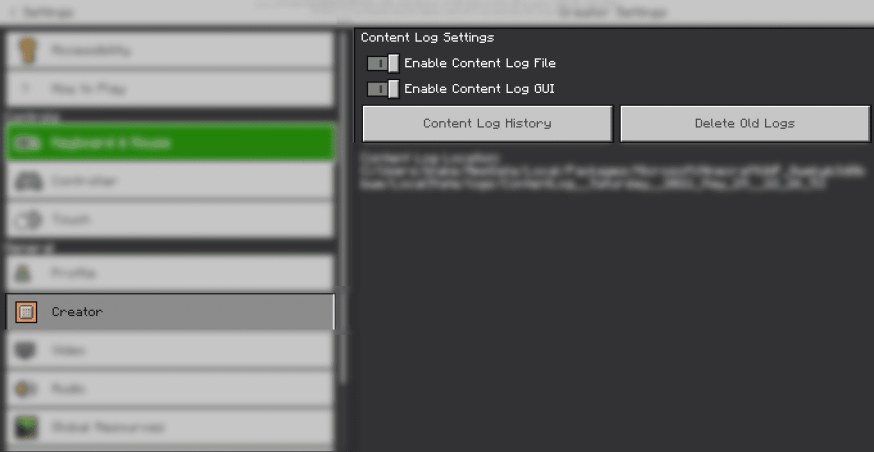
Content Log is an extremely important debugging tool, which you should always have on.
Turn on both content log settings in Settings > Creator. This will show you any errors in your add-on when you enter a world with it applied.
You can open the content log GUI in-game by pressing Ctrl + H or by pressing Content Log History in the creator settings panel. Learn more about the content log here.
Creating Your Testing World
Now we create a world to test your new add-on!
Click "Create new world";
Now activate your behavior pack and your resource pack from the "Available" tab.
Now click 'Create'!
Overview
Here is how your project should look, after completing this page:
Remember that in the future, we will represent com.mojang/development_behavior_packs/guide_RP as RP, and com.mojang/development_behavior_packs/guide_BP as BP.
- en_US.lang
- languages.json
- manifest.json
- pack_icon.png
- en_US.lang
- languages.json
- manifest.json
- pack_icon.png
What You Have Learned
What you have learned:
- What the
com.mojangfolder is, where it is and what folders it contains - How to setup your workspace
- What a
manifest.jsonfile is - How to use UUIDs
- How to create an icon for your add-on
- What a
.langfile is
Your Progress So Far
What you have learned
- Set up your pack
- Create a custom item
- Create a custom entity
- Create the entity's loot, spawn rules and a custom recipe
Contributors


