Editing Wiki Pages
Now that you have the wiki set up locally, you can edit the files right on your device. If you don't know how to work with VSCode, there are some very good videos from Microsoft itself here.
To make our pages look prettier, we have a lot of great tools that you can use to highlight sections, insert components, insert images, and much more!
Page Setup
Each page consists of two parts: frontmatter and content.
Inside the frontmatter you write the most important information about your article.
---
title: A Wonderful Page Title
description: Make your first contribution!
license: true
mentions:
    - username
---
Lots and lots of content!Frontmatter
| Field | Required | Default | Description |
|---|---|---|---|
title | ✔️ | None | The title of the page which will be displayed as a level 1 heading before the main content and in link embeds when posted somewhere. |
description | ✔️ | None | The description of the page which will be displayed in link embeds when posted somewhere. :, " symbols are not allowed here. |
example | ❌ | None | Associates a collection of example files from the bedrock-examples repository with this page. The value should be the name of a folder in "resources". |
category | ❌ | None | The sidebar category in which the link for this page will be displayed. Available categories are listed in the section's section.yaml file. |
tags | ❌ | [] | A list of tags that will be displayed at the top of the page. Some will be displayed on the sidebar, such as "guide" or "info". If a page is in a section or category that makes the tag redundant, it should not be included in the tags list. For example, if a page is in the "Tutorials" category, the "guide" tag is not needed. |
nav_order | ❌ | None | The order in which the article will appear in the sidebar. Lower number will be higher. All nav_order pages will appear above pages without a nav_order. |
outline_depth | ❌ | 3 | The maximum heading level that should be displayed in the page's outline. This may be decreased from the default to hide headings that are repetitive or increased to show headings in pages that have more layers for easier navigation. |
related | ❌ | [] | A list of links to pages covering related topics that should be displayed in the page outline. |
show_contributors | ❌ | true | Whether a list of the provided mentions should be shown at the end of the page. |
show_edit_link | ❌ | true | Whether a link should be shown which leads to the page in the GitHub repository. |
show_outline | ❌ | true | Whether a list of heading links should be generated for the page. |
hidden | ❌ | false | Whether the page should be hidden from the sidebar. This should be used on content that is no longer supported but may still be accessed through a direct link. |
license | ✔️ | None | How content on the page is licensed. This should either be a string referencing a license ID such as MIT, or an object defining separate main and code licenses. |
mentions | ✔️ | [] | The usernames of all GitHub users that have contributed to this page. Get that credit! Make sure you add your username here for any pages you edit. |
The title is required, as it is the name shown in the bar on the left side. Mentions isn't needed, but it would be great if everyone knows who made the great article they are reading!
Available Categories
The list of available categories in a section can be found in the section's section.yaml file, along with color and ordering information. You may add new categories there as well.
Here are some of the common categories that you'll be able to use in most sections, check the page sidebar for others:
- General
- Tutorials
- Documentation
Available Tags
Tags are defined in the docs/tags.yaml file. If you'd like to add a new tag, that's where you should head!
If you're just looking for existing tags, here is the list of tags that this wiki currently supports:
- beginner
- beta
- deprecated
- easy
- experimental
- expert
- function
- guide
- help
- info
- intermediate
- method
- outdated
- scripting
Content
After the frontmatter, you write the main content of your page. The page content is written in markdown and can make use of custom components to enhance it and make it consistent with the rest of the wiki.
These components can be used to add things like buttons, spoilers or code blocks. It's also possible to use some HTML, but we only recommend this for advanced users and won't cover this in our guide.
PAGE TITLE
A common mistake everyone does the first time is to repeat the page title as a level 1 heading in their page content. You should never do this because the title given in the frontmatter will already be placed at the top of your page automatically, and having multiple level 1 headings in a single page is invalid.
Bedrock Examples
Sometimes we need to give a template/example pack after a guide. For this purpose we use separate GitHub repository: bedrock-examples. Please, add your packs there. It helps us to maintain all add-ons and keep them up-to-date.
Viewing the Wiki Locally
Its really hard to know how your article will look when its finished and published. To help with that, you can run a version of this website on your own device!
In VSCode, in the top menu bar, click on Terminal, then on New Terminal in the dropdown.
INSTALLING DEPENDENCIES
The first time you want to view the wiki locally, you'll have to run npm install and wait until it's finished to make sure that everything is set up correctly.
To view the wiki locally, type npm run dev and press enter and wait until it's finished loading. You'll know it's ready when you see this:
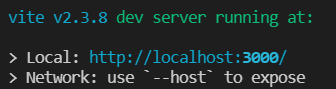
Hover your cursor over the part where it says http://localhost:5173/, hold Ctrl and left-click. Your browser will open a new tab with your local version of the wiki.
Done! Every time you change and save a file in VSCode it will automatically be updated in your browser.
Viewing the Built Page
The above tool shows you how the wiki will look when it is built. But sometimes there are some errors arriving which you only get if you build the page.
Building the pages means compiling every markdown file to a HTML page, which will be hosted on our servers. If you just use npm run dev, the pages are not compiled that way and there may be some errors which are not showing in the developer view.
To build a page, follow the above process, except for the step where you need to type npm run dev. Instead, type npm run build which will build the page.
TIP
Using npm run build, node will compile all pages inside the wiki, even some pages which are really big. If you are not editing any of the following pages, you should run npm run fastbuild, which builds every pages except these pages.
[
    "entities/vanilla-usage-components.md",
    "entities/vanilla-usage-spawn-rules.md",
    "entities/vuc-full.md",
    "entities/vusr-full.md"
]This might take a while. If the process finishes without any errors, you can view the built wiki by running npm run preview. Then, open the link given in the terminal and you are done!
Working with Markdown
The wiki uses Markdown, a powerful text-formatting syntax. To learn more about Markdown, visit the official Markdown Guide!
We won't teach you the whole Markdown language, but there are some things that you need to pay attention to!
Containers
Containers are used to inform or warn the user about some really important stuff. There are four types of containers: info, tip, warning and danger.
Containers are created by typing three colons and the type of the container. Then, you can write your content and at the end you close the container by typing three more colons.
:::info
Some info here
:::

:::tip
A tip here
:::

:::warning
A warning here
:::

:::danger
A dangerous place
:::

:::details
Some necessary details here
:::INFO
Some info here
TIP
A tip here
WARNING
A warning here
DANGER
A dangerous place
Details
Some necessary details here
IT IS NOT RECOMMENDED TO USE details CONTAINER. This container is not styled properly and not really needed.
You also can add headers for containers:
:::danger STOP!
A dangerous place
:::STOP!
A dangerous place
Syntax highlighting on inline code blocks
The wiki has support for syntax highlighting on inline code blocks.
Here is an example of how to use it:
`console.log("Hello World!");`{lang=js}The above example will render as:
console.log("Hello World!");
Links
If you want to refer to another website, like the Microsoft Docs, you can use links.
To link something in Markdown, you can either just write out the whole link:
Or show some other text instead of the link:
Linking to sources outside the wiki
To link to another source, just copy the whole link url (including the https part in front of it) and paste it between the round brackets:
[Official Creator Docs](https://learn.microsoft.com/minecraft/creator/)Linking to other pages in the wiki
You can create links that redirect you to other pages in the wiki. These are called "relative" links.
[Redirect to the contribute page](/contribute)Redirect to the contribute page
[JSON Arrays](/guide/understanding-json#arrays)[Go to Working with Markdown heading](#working-with-markdown)Go to Working with Markdown heading
To redirect to another page, just look in the file explorer inside the docs folder. To link to a page thats directly inside this folder, you can just write /pagename, like /contribute to link to the contribute page. Every page that is inside a folder has to be accessed by writing the name of the folder, a slash, and then the page name (without the .md extension): /blocks/block-materials.
WARNING
NEVER use absolute links to link to a page inside our wiki. Make sure you don't include wiki.bedrock.dev inside your links.
Lists
Unordered Lists
A regular bullet-pointed list.
-   This
-   Is
-   A
- List- This
- Is
- A
- List
Ordered Lists
A list with consecutive numbers in place of bullet points.
1.  This
2.  Is
3.  A
4. List- This
- Is
- A
- List
Checked Lists
A list where each item is either checked or unchecked. An x between the square brackets marks the item as checked.
-   [x] This
-   [x] Is
-   [ ] A
- [x] List- This
- Is
- A
- List
Working with Components
Our wiki uses special Vue-Components, which you can use to add things like Buttons, Spoilers, CodeBlocks, etc.
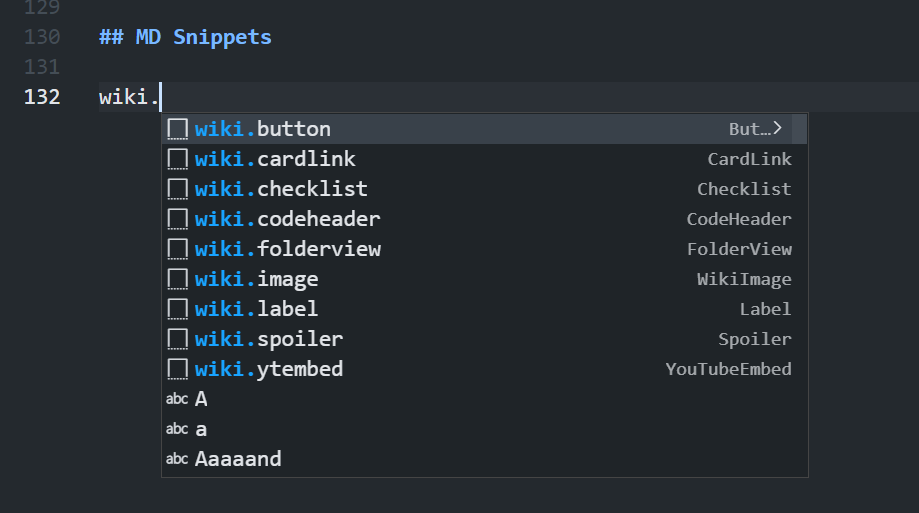
SNIPPETS
We have snippets for our components. To see them, press Ctrl + Space when editing a page.
Accent Colors
Some components support a color attribute which can be used to add more visual flair! Here are the values that the wiki currently supports:
- red
- orange
- yellow
- green
- blue
- purple
Button
A button works like a link, but is more noticeable for the user.
<Button link="/">
    Homepage
</Button>A color can also be specified to make your button pop out even more!
<Button link="https://youtube.com" color="red">
    YouTube
</Button>| Attribute | Required | Type | Note |
|---|---|---|---|
| link | Yes | String | Link to redirect when clicking on the button you can also link there content to download from wiki files. If doing this for pictures, add download after link value. |
| color | No | AccentColor | Defines the accent color of the button. By default, the button will use the base wiki accent color seen in links. |
The text between the two Button tags is the text that will appear on the button.
The link can either be an external website, or a page in our wiki. For the last case, use relative links, as described in our linking section.
Card
With cards you can make fancy boxes with an image and text which contains a link!
Cards may also have content which is defined between two Card tags.
<Card image="/assets/images/icons/logo.png" title="Title" link="https://google.com">

This is some _content_.

</Card>Title
This is some content.
| Attribute | Required | Type | Note |
|---|---|---|---|
| image | Yes | String | Link to the image to display left of the title. |
| title | Yes | String | Title to show above the content. |
| link | No | String | Link to redirect on clicking the title |
Don't overuse them! They look cool, but someone could really give them too much attention and forget to focus on other important parts of your article.
CardGrid
Used to display multiple cards in a grid layout.
<CardGrid>
<Card image="/assets/images/icons/logo.png" title="Title 1" link="https://google.com">

This is some _content_.

</Card>
<Card image="/assets/images/icons/logo.png" title="Title 2" link="https://google.com">

This is some _content_.

</Card>
<Card image="/assets/images/icons/logo.png" title="Title 3" link="https://google.com">

This is some _content_.

</Card>
</CardGrid>CodeHeader
Code headers are used to give additional context to a code block so that users know exactly where to put the code.
<CodeHeader
    path="RP/entity/example.json"
    breadcrumbs="minecraft:client_entity/description/scripts"
/>

```json
"pre_animation": [
    "v.is_hidden = q.property('wiki:is_hidden');"
]
```"pre_animation": [
"v.is_hidden = q.property('wiki:is_hidden');"
]| Attribute | Type | Note |
|---|---|---|
| path | String | File location of the code. |
| link | String | Link to redirect on clicking the path. |
| breadcrumbs | String | Section of the file that contains the code. Breadcrumbs are separated using slashes. |
linkcan only be defined if the code header also has apath.At least one of
pathandbreadcrumbsmust be defined. Make sure to follow our style guide when describing filepaths:If you link inside a behavior pack, place
BPin front of all other files:✔️
BP/blocks/example.json❌
YourBehaviorPack/blocks/example.jsonSame for the resource pack, use
RPin front of all other files:✔️
RP/manifest.json❌
YourResourcePack/manifest.json
FolderView
Folder views can be used to show a setup of files, like in our Project Setup guide.
<FolderView :paths="[
    'com.mojang/development_resource_packs/Guide RP/texts/en_US.lang',
    'com.mojang/development_resource_packs/Guide RP/manifest.json',
    'com.mojang/development_resource_packs/Guide RP/pack_icon.png',
    'com.mojang/development_behavior_packs/Guide BP/texts/en_US.lang',
    'com.mojang/development_behavior_packs/Guide BP/manifest.json',
    'com.mojang/development_behavior_packs/Guide BP/pack_icon.png',
]" />- en_US.lang
- manifest.json
- pack_icon.png
- en_US.lang
- manifest.json
- pack_icon.png
| Attribute | Required | Type | Note |
|---|---|---|---|
| paths | yes | Array of strings | Represents all files and folders which should be displayed. The leading : is required. |
The paths attribute is an array that contains a list of all separate file paths. Each file path must be written entirely and has to be wrapped inside single quotes.
WARNING
Remember not to put any empty lines inside the list! This will throw an error when compiling the page.
Label
A Label is a small icon with uppercase letters that can be used to give your articles more flair.
<Label color="green">
    Label Text
</Label>| Attribute | Required | Type | Note |
|---|---|---|---|
| color | Yes | AccentColor | Background color of the box. |
Don't overuse them! They look cool, but someone could really give them too much attention and forget to focus on other important parts of your article.
Spoiler
A spoiler can be used to hide some content, so it doesn't block the whole site.
<Spoiler title="Title">

text here

and here

</Spoiler>Title
text here
and here
| Attribute | Required | Type | Note |
|---|---|---|---|
| title | Yes | String | Will be displayed before the arrow in the open button. |
The content between the two tags is the content that will be hidden.
Pay attention to the empty lines between the content and the tags! If you forget these, this component will not work!
Tag
A tag is a type of label that appears by default at the top of your page based on its frontmatter. If you'd like to manually include a tag at a certain point in your page, using this component is preferable over a regular label.
<Tag name="beginner" />| Attribute | Required | Type | Note |
|---|---|---|---|
| name | Yes | TagName | Name of the tag to display. |
WikiImage
The default method to add an image is looks like the following: 
WikiImage is a alternative way to add an image in your article, providing more parameters than a regular markdown image, including pixelated rendering and captions.
Note that images go in docs/public/assets/images/ folder, but their path is defined without the docs/public prefix.
<WikiImage
    src="/assets/images/icons/logo.png"
    alt="alternative text"
    caption="Such a beautiful image!"
    width="420"
    pixelated
/>| Attribute | Required | Type | Note |
|---|---|---|---|
| src | Yes | String | Link to the image to show. |
| alt | Yes | String | Text to show if the browser can't load the image and for accessibility purposes e.g. use of screen readers. |
| caption | No | String | Text to show below the image as a caption. |
| width | No | String | Width of the image. If only the width is included, the height will automatically scale. |
| height | No | String | Height of the image. If only the height is included, the width will automatically scale. |
| pixelated | No | Boolean | Whether the image should be pixelated. |
YouTubeEmbed
Embeds a YouTube video into the page based on a video ID.
<YouTubeEmbed id="dQw4w9WgXcQ" />| Attribute | Required | Type | Note |
|---|---|---|---|
| id | Yes | String | ID of the video to display. |
New Lines
Always remember to add new lines before and after components!
Wrong:
-   one
-   two
<CodeHeader path="BP/blocks/example.json" />
```json
{
    "some": "json"
}
```Correct:
-   one
-   two

<CodeHeader path="BP/blocks/example.json" />

```json
{
    "some": "json"
}
```Formatting Guide
Everyone likes to read wikis that are perfectly and consistently formatted.
Well, its hard to realize that. And we don't want perfectly and consistently formatted wikis. But if everyone tries to follow these simple rules, all users will have a better time reading our wikis!
General Rules
- For naming packages, folders, etc. consult our Style-Guide.
Title Case
Title case is a casing style that must be used in page titles and headings.
- Most words should be capitalized regardless of length.
- Articles (a, an, the), coordinating conjunctions (and, but, or), and prepositions (in, on, at, of, to) should not be capitalized unless any of the following are true:
- They're the first or last word of the title.
- They make up a noun (such as add-on).
Some examples:
Welcome to the Wiki!Your First Add-OnHow It Works
Headings
- Don't use level-1 headings. Your page starts with a level-1 heading which has the same title as written in the Front Matter.
- Try to avoid heading levels higher 4. They wont show in the right sidebar (only level-2 headings appear there) and won't have proper styling.
- Use the
Title Casestyle. - Don't use
:in your headings!
Some examples:
✔️
## A Page❌
# A Page✔️
### Some Other Layer❌
###### Some Other Layer✔️
## My Own Article❌
## my own: article✔️
## Next Steps❌
## Next Steps:
JSON Code
- Use CodeHeaders, unless it is illogical or not possible.
- Fully extend JSON Code if it improves readability aka. as "Prettified Code".
- Do not extend
.geo.jsonfiles as it would be too long.
- Do not extend
- If the code is too long or not necessary, wrap it in a spoiler component.
- Use
RPandBPas root folders. - Make comments but not many.
Describe the most important things in comments inside the JSON, you can tell about other components after the code. Also follow our comments style. Example:
{
    "format_version": "1.26.30",
    "minecraft:item": {
        "description": {
            // Describing an object with components.
            "identifier": "wiki:copper_coin",
            "menu_category": {
                "category": "construction"
            }
        },
        "components": {
            "minecraft:max_stack_size": 64, // Short description of a value/component.
            // Make notes about a group of specific components (icon and glint in our case) used below this way.
            "minecraft:icon": "wiki:copper_coin",
            "minecraft:glint": 3.5
        }
    }
}minecraft:max_stack_size...
minecraft:icon...
Markdown Formatting
This section is only for the readability of your Markdown files. It wont be visible in the wiki.
- If you use unordered lists, use 3 spaces after the
-. - Prettify Markdown tables. Use spaces and
-to extend all rows to the same lengths. Use one space before and after each cells content. - Avoid using raw HTML tags, even though they are supported. You can use them if you know what you are doing, but only if it's absolutely unavoidable. If you have an idea for a new component that could be useful for everyone, let us know and maybe we will add it!
PRETTIER
The above steps will be done automatically if you install the Prettier extension (highly recommended).
✔️
- list❌
- list✔️
| Some Data | Aaaaand More Data |
| --------- | ----------------- |
| here | and here |❌
| Some Data | Aaaaand More Data |
|----|---------|
| here | and here|✔️
<WikiImage src="/my/image.png" alt="Alternate text" />❌
<img src="/my/image.png" alt="Alternate text" />✔️
`code`❌
codeYou can do space before text this way:
> texttext
Sometimes you need to comment something in your markdown for other contributors to see.
<!-- Comment! 👀 --> ‹- It is here!Contributors


